Client OAuth
This guide will get your client set up and ready to develop with the OneTwentyone API. We’ll cover how to get started with an API client and how to authenticate your first user and make requests.
Before you can make requests to the OneTwentyOne API, you will need to create a OneTwentyOne account by downloading the 121 Health App. You must complete the sign on process in the app before creating your API client, so do this now.
How it works
The 121 Health app provides a longevity-focused health analysis to iOS users. It personalizes insights by using all possible health data, from Apple Watch data to blood tests to supplements.
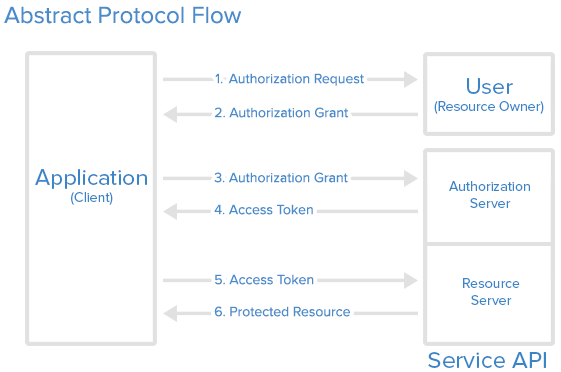
The OneTwentyOne API allows you to programatically access our unified API for users of your application (or just yourself). Once users sign up for the 121 Health App, they're able to follow the standard OAuth 2.0 protocol to authorize you to access their data.
We recommend reading up on the OAuth 2.0 flow if you aren't familiar, but here's a graphic of how it works in abstract:
Create a client
After creating your account in the 121 Health app, sign in and create a client. Enter the following details:
- Name: A name for your client
- Description: A description of your client
- Redirect URIs: The URIs to redirect users to after they authorize your client. You're able to receive an authorization code at this address to exchange for an refresh token.
- Scopes: The permissions your client needs to access the API. Like Apple Health, our API allows you and users to select fine-grained access to their data.
Scopes you select here comprise the list of scopes your users can select from. This doesn't guarantee that you'll be able to access all of these scopes for each user.
After you create a client, make sure you save your client ID and client secret. You'll need these to authenticate your users, and you can only see your client secret once. Don't lose it, or else all your users will have to reauthenticate!
Authorizing your first user
Now you're ready to authorize a user. Here are the steps you need to follow
- Redirect the user to the https://api.onetwentyone.ai/authorize with the following parameters:
response_type: Set this tocode, as this is the only OAuth 2.0 sign on type that we support for now.client_id: Your client IDredirect_uri: The URI you want to redirect the user to after they authorize your clientstate: A random string to protect against CSRF attacks. You should validate this when the user is redirected back to your site.
Here's an example URL: https://api.onetwentyone.ai/authorize?response_type=code&client_id=4f34fb13-f5b0-4546-bf97-717afc4984a4&redirect_uri=https://121health.app/authtest&state=WeHH_yy2irpl8UYAvv-my
-
At this URL, the user will sign in, and they can select which scopes that your client will have access to.
-
After the user authorizes your client, they will be redirected back to your specified redirect uri with an authorization code in the query string, along with their UUID user_id (make sure you save this user_id and connect it with your user_id or unique identifier!).
-
Exchange the authorization code for an access token and refresh token by sending a
POSTrequest to the/api/tokenendpoint (fully documented here) with the following parameters:client_id: Your client IDclient_secret: Your client secretcode: The authorization code you receivedredirect_uri: The URI you used to receive the code.
-
You will receive a JSON response with an access token and refresh token. This access token lasts an hour, and you can use it to make your first request. Save your refresh token, as you will need them to make requests to the API.
Making your first API request
After you've followed the steps above with your own account, you're ready to make your first API request. Try a simple request to the GET request /api/v1/quantity/user_id/stepCount (replacing user_id with the user_id you received in the authorization code step) endpoint to get the user's step count. Make sure you include a Bearer {access_token} header in your request.
What's next?
Great, you're now set up with an API client and have made your first request to the API. Here are a few links that might be handy as you venture further into the OneTwentyOne API:
- Get the lowdown on auth
- View the full specifications for the quantity and sleep endpoints
- Iron out the details with rate limiting and pagination